The best Depop pricing strategy is simple: find what comparable items have actually sold for, work backward from your target profit through Depop's fees and shipping, then list a little above that number so offers still land where you want. Asking prices tell you what sellers hope for. Sold prices tell you what buyers paid. If you want the sold evidence in seconds instead of scrolling shops, PriceXPoint takes a photo or an item name and returns sold, asking and new listings from several marketplaces, with links to the sales behind the numbers.
This guide is for resellers, collectors and casual sellers who want a repeatable method. It covers the fee math for US sellers, how to read comps, how to handle offers, shipping and boosts, and when to change a price.
TL;DR
- Price from sold listings, not active ones. Collect three to five comparable sales in similar condition and aim for the middle, not the highest outlier.
- In the US, Depop charges sellers no selling fee, only payment processing of 3.3% + $0.45 on item price, shipping and tax. Work your list price backward from your target profit.
- Leave a 10% to 15% cushion for offers, because buyers on Depop negotiate.
- Boosting a new listing costs 12% of the item price in the US and UK, so build it into the price before you turn it on.
- Review each listing after a couple of weeks: likes with no offers usually mean the price is off.
Table of Contents
- Why guessing your Depop price costs you money
- Step 1: Build your comps from sold listings
- Step 2: Work backward from fees to a list price
- Step 3: Decide who pays shipping
- Step 4: Leave room for offers
- Step 5: Decide whether to boost
- Step 6: Review and adjust after two weeks
- Common Depop pricing mistakes
- Price a whole haul without the scroll
- Our perspective
- FAQ
- Sources
Why guessing your Depop price costs you money
Price too high and a listing sits for months collecting likes. Price too low and you sell in an hour and wonder why. Neither is a strategy. The fix is evidence: what similar items sold for, in what condition, on which platform.
Depop gives you a starting point. Its Help Centre says its machine-learning models compare your listing's gender, description, product type, brand and condition with similar items that have sold before, then show three options: "Likely to sell", "Balanced" and "Less likely", from lowest price and fastest sale to highest price and slower sale. Depop describes the range as a guide only, with sellers keeping full discretion and no guarantee of a sale. Depop's seller API documentation adds that this pricing inspiration is available only for UK and US items and excludes luxury brands, and that it depends on complete product attributes.
So the built-in suggestion is useful, but it is one input. A reseller who sells a vintage jacket, a rare sneaker or a designer piece needs real comps. That is the first step of the method below.

Step 1: Build your comps from sold listings
A comp is a comparable item that already sold. Good comps match on brand, item type, size, condition and era. The steps:
- Search the exact item. Use the brand, the style name or number, and the item type. "Nike fleece" is too loose; the specific style and colorway are better.
- Look at what sold, not what is listed. Active listings include hopeful prices that never convert. On Depop, check comparable sellers' shops and look at their sold items where your app version shows them.
- Match condition. A pair of sneakers worn once and a pair with scuffed soles are different products. Note condition on every comp.
- Collect three to five sales, more for items with wide price swings, and ignore the single highest sale. One lucky buyer does not set a market. We explain why in why one high sale can mislead.
- Take the middle of the range as your target value.
The weak point is time. Scrolling several shops, then repeating the process on other marketplaces, can take longer than the item is worth, especially when you have a haul of thirty pieces. And asking prices are everywhere, which is why we wrote sold price versus asking price: only one of them is real money.
This is where PriceXPoint does the legwork. Snap a photo or type the item name, and the app returns sold, asking and new listings across multiple marketplaces, filtering out unreliable listings. Every estimate links to the actual sales, so you can see the comps yourself and correct the item identification if the app read the item wrong.
Cross-check other marketplaces
Depop's buyers skew toward vintage, streetwear and trend-driven fashion, so the same item can sell for more or less elsewhere. Checking at least one other marketplace shows whether your Depop number is a premium or a discount. It also shows you whether Depop is the right place to sell that piece at all. If you list across platforms, our comparison of marketplace fees helps you see where your margin is largest.
Step 2: Work backward from fees to a list price
Most Depop pricing mistakes are fee mistakes, and much of what is online is out of date because Depop changed fees market by market.
Here is what applies to US sellers, according to Depop's own Help Centre:
- Sellers pay no selling fee, only payment processing of 3.3% + $0.45 in the US, charged on item price plus shipping and applicable taxes. The UK rate is 2.9% + £0.30 and Australia's is 2.6% + $0.30 AUD.
- Sellers outside the UK, US and Australia pay a 10% selling fee plus PayPal processing, so check your own country's table before using any US example.
- The 12% boosting fee applies to new UK and US listings boosted from 23 March 2026.
Depop also teaches a cost-plus approach on its blog: add your outgoing costs and desired profit, then include fixed costs such as selling fees before listing. Outgoing costs include what you paid for the item, packaging and any cleaning.
The reverse formula
Instead of adding a markup and hoping, solve for the price. For a US seller with a standard sale:
List price = (item cost + desired profit + $0.45) ÷ 0.967
The 0.967 is what is left after the 3.3% percentage fee. Worked example: you paid $10 for a jacket and want $20 profit.
- ($10 + $20 + $0.45) ÷ 0.967 = $31.49
- Processing on $31.49 is about $1.49, so you receive about $30.00, and after the $10 cost you keep $20.
Processing also applies to shipping and sales tax, so round up a few cents. If the buyer pays $6 shipping, 3.3% of that is about $0.20 more coming off your side. Fold that in and a $31.69 listing is a safer choice.
Why cheap items need extra care
The $0.45 is fixed, so it takes a bigger bite out of low-priced sales. On a $10 sale it is 4.5% before the percentage fee. On a $100 sale it barely registers. If your average item is under $15, small price bumps or bundle deals matter more than they would for a $200 jacket.
The buyer fee is not your fee, but it affects your sale
Depop's blog says buyers in the US, UK and Australia pay a marketplace fee of up to 5% of the item price plus up to $1, excluding taxes and postage, shown at checkout. It does not come out of your payout. It does raise what the buyer sees: on a $40 item, a buyer can pay up to $43 before shipping. When two similar listings compete, that extra amount is one more reason to price at the market rather than above it.
Step 3: Decide who pays shipping
Shipping changes the price your buyer sees, and it is part of the amount processing is charged on. Two clean options:
- Buyer pays shipping. Your item price stays lower and looks more competitive in search. You must still make sure the label cost is covered by what the buyer pays.
- Free shipping. The buyer sees one all-in price, which many buyers prefer. You pay the label, so raise the item price by roughly the label cost. For light items like tees and jewelry this often works well.
Whichever you choose, weigh the package before you list and price from the real label cost, not a guess. A heavy hoodie priced as if it ships like a tee can erase your profit. Add packaging too, since mailers, tape and tissue often run from cents to a couple of dollars per parcel across many orders.
A useful habit: write down three numbers on every item before listing, namely cost, label cost and packaging. Then your profit is a subtraction instead of a surprise.
Step 4: Leave room for offers
Depop buyers love to make offers, and the platform has a built-in offer feature. If your list price equals your lowest acceptable price, every negotiation costs you money. Instead:
- Decide your floor, the lowest price that still meets your profit target from the reverse formula.
- Add a cushion of roughly 10% to 15% and list there.
- Accept offers at or above the floor. Counter ones just below it.
Example: your floor is $31.49. List at $36 to $37. A buyer offering $33 is still a good sale for you, and the buyer feels they negotiated a deal.
Do not go overboard. A listing priced far above the market does not attract offers, it attracts nobody. If comparable sales sit around $40 to $55, listing at $85 simply parks the item. The cushion works only when the starting price is already close to what the market pays.
Use bundles to raise order value
A small bundle discount for two or more items, in the range of 10% to 15%, can lift the order total and spread one shipping label over more products. It works best when your shop has coherent items, such as several vintage tees in one size range.
Step 5: Decide whether to boost
Boosting promotes a listing in exchange for a fee. For new UK and US listings, the fee is 12% of the item price, per Depop's fees page. That is large next to the 3.3% processing fee, so treat it as a cost of the sale, not a freebie.
If you do plan to boost, price it in. With processing and boost together, the reverse formula changes to:
List price = (item cost + desired profit + $0.45) ÷ 0.847
Same jacket as before: ($10 + $20 + $0.45) ÷ 0.847 = $35.95. That is about $4.50 higher than the unboosted price for the same $20 profit. Boosting makes the most sense for items with healthy margins and strong comps, where the extra exposure turns into a quick sale. On a thin-margin $12 item, the math rarely works.

Step 6: Review and adjust after two weeks
Pricing is not set and forget. Give a listing a couple of weeks, then read the signals:
- Views but no likes: the title or photos may not convince buyers.
- Likes but no offers: the price is probably the issue. Compare your list price against your comps again.
- No views at all: look at the photos, title, hashtags and category before touching price.
- Offers that cluster below your floor: the market is telling you the value is lower than your comps suggested. Check whether condition or size differs from your comps.
When you do cut the price, do it in meaningful steps rather than a dollar at a time. A change under about 5% rarely moves a buyer and can leave you grinding your margin down for nothing. If you need a framework for faster turnover, see how to price used items to sell fast without underpricing.
Seasonality matters as well. Items like outerwear, vintage sportswear and band tees have strong seasons, so refresh your comps with recent sales rather than last year's, and consider holding a winter coat through summer if your margin allows.
Common Depop pricing mistakes
- Copying active listings. Active prices are wishes. Sold prices are results.
- Using the highest sale as the target. It is an outlier, not a market.
- Forgetting the fixed $0.45 and the processing on shipping and tax. Small amounts add up across dozens of sales.
- Using fee guides from the wrong country or year. Fees differ by market and changed in 2024 and 2026, so check the Help Centre for yours.
- Mismatching condition. Comp a worn item against mint sales and you will price yourself out.
- Pricing for the first sale instead of for the shop. Early five-star reviews help later listings, so a sharp first few prices can pay off.
Price a whole haul without the scroll
If you source in volume, comping item by item is the bottleneck. PriceXPoint supports bulk pricing through a CSV file or multi-item photos, saves your scan history and lets you export it, so a sourcing trip becomes a priced inventory list. You can start on the free tier, and paid plans are Basic at $4.99 per month, Pro at $9.99 per month and Power at $24.99 per month. If you prefer to pay per lookup, token packs are 100 tokens for $5.99, 300 tokens for $12.99 and 1000 tokens for $34.99, all one-off. See the details on the pricing page.
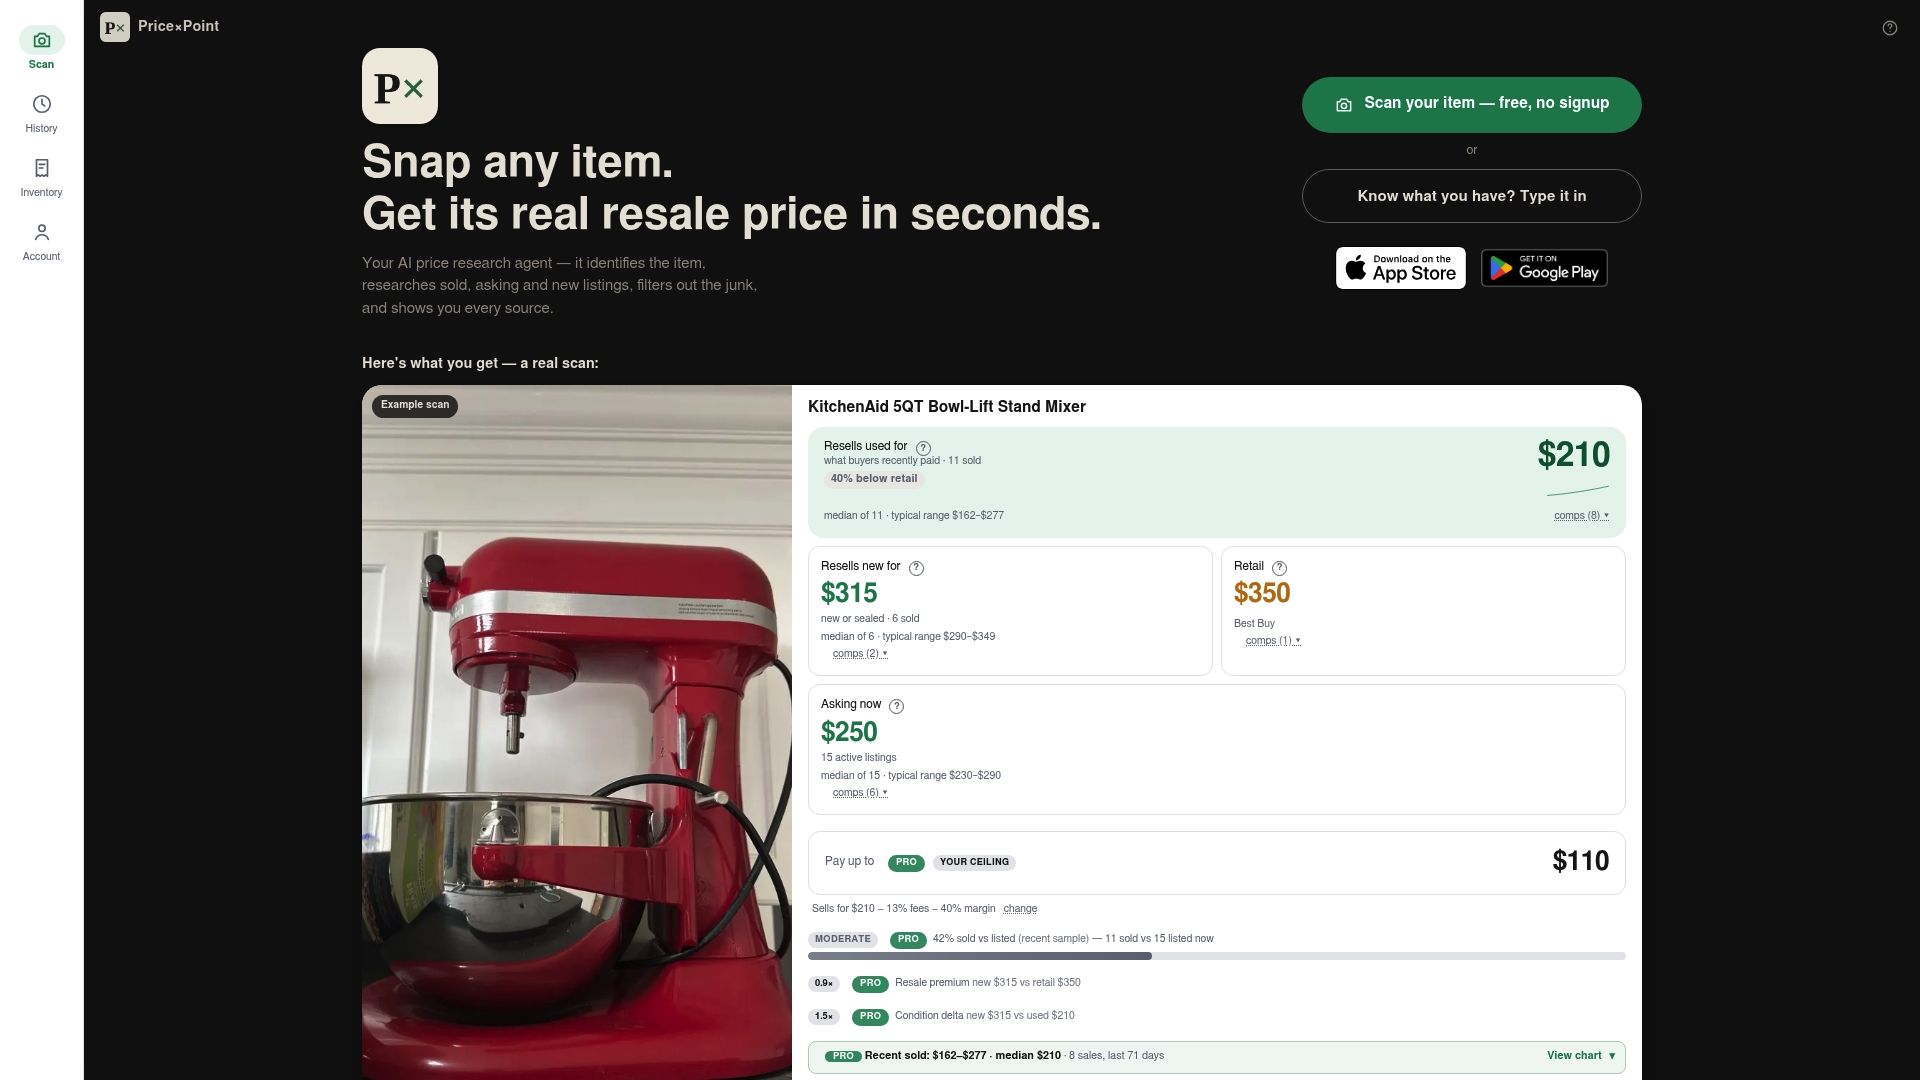
Here is how it fits the method: the app gives you the sold comps for Step 1, with a link to each sale, and you take it from there with the fee formula. Our estimates are tied to sold listings and never shown without supporting evidence, so you can check them before you list. For more on how apps handle this, read which selling apps price your item for you, or see our take on AI for resellers that shows sold listings.
Our perspective
Most Depop advice stops at a tip: price a little high, expect offers. That is fine as far as it goes, but a tip is not a number. The seller still has to know what a buyer actually paid last month for the same item.
We built PriceXPoint around that question. We publish price estimates linked to real sold listings from several marketplaces, we name every data source, and we do not give a figure without evidence behind it. If the app misreads your item, you can correct the identification and get a better answer.
That matters on Depop because trend-driven fashion moves quickly, and a price that was right last season may be wrong now. When you start from verified sales and then apply the fee formula, you stop arguing with yourself over a list price and start making decisions you can defend.
PricexPoint
FAQ
What should my prices be on Depop?
Start with the middle of three to five recent sold prices for the same item in the same condition. Then use the reverse formula to confirm that price covers your item cost, fees, shipping and profit, and add a 10% to 15% cushion for offers. Depop's own suggested range is a useful cross-check, but it is a guide only.
Are there fees for selling on Depop?
For sellers in the US, UK and Australia there is no selling fee, only payment processing. In the US it is 3.3% + $0.45 on item price, shipping and applicable taxes. Boosted new listings in the UK and US carry a 12% boosting fee, and sellers outside those markets pay different fees, so check Depop's fee page for your country.
How do I find sold listings on Depop?
Search for the exact item, then look through the shops of sellers with similar pieces and check their sold items where your app shows them. Because that is slow, many sellers also check sold data across other marketplaces. PriceXPoint returns sold listings from multiple marketplaces from a photo or a name, with links to the sales.
Should I offer free shipping on Depop?
For light items such as tees and accessories, free shipping often helps because buyers see one clear price. Raise the item price by about the label cost so your profit holds. For heavy or bulky items, letting the buyer pay shipping usually keeps your price competitive.
How often should I change a Depop price?
Give a listing about two weeks, then read the signals. Likes without offers point to price, while no views points to photos or title. Make a meaningful cut instead of tiny drops, and refresh your comps first so the new price is based on current sales.
Sources
- How to price your item, Depop Help Centre
- Seller fees and charges, Depop Help Centre
- Pricing Inspiration, Depop Selling API
- Find your pricing formula, Depop blog
- How Does Depop Work?, Depop blog